
Your brakes are the single most critical safety feature on your motorcycle. Horsepower and torque mean nothing if you cannot bring your machine to a safe, controlled stop. Over time, however, that crisp, firm feeling in your brake lever or pedal can degrade, becoming soft and “spongy.” This occurs because brake fluid absorbs moisture and heat, which introduces air into the hydraulic lines.
Air compresses under pressure, whereas liquid does not. When air enters your brake system, the mechanical force from your hand or foot is wasted, leading to dangerously long stopping distances. In this comprehensive guide, we will break down why brake fluid degrades and give you a bulletproof, step-by-step blueprint to bleed your motorcycle brakes like a professional.
The Threat: Why Do Motorcycle Brakes Feel Spongy?
To understand how to fix your brakes, you need to understand how hydraulic systems operate. When you pull the brake lever, the master cylinder pushes brake fluid through the rubber or braided steel lines down to the calipers. The fluid forces the pistons out, clamping the brake pads tightly against the spinning rotor.
The Hidden Danger of Old Brake Fluid (DOT 4 vs. DOT 5.1)
Brake fluid is hygroscopic, meaning it acts like a sponge, actively absorbing moisture from the air over time. As moisture content increases, the boiling point of the brake fluid drops significantly. Under hard braking, the fluid boils, creating gas bubbles. Since gas compresses easily, your lever pulls all the way to the handlebar without stopping the bike.
- DOT 4: The most common fluid used in modern motorcycles. It has a high dry boiling point but must be changed every 1 to 2 years to prevent moisture damage.
- DOT 5.1: Offers an even higher boiling point for high-performance track riding, but absorbs moisture even faster.
- Note: Never mix glycol-based fluids (DOT 4/5.1) with silicone-based fluids (DOT 5), as they will turn into a thick gel and lock up your braking system.
Tools and Garage Prep Work
Working with brake fluid requires extreme care. Gather these essential tools before cracking open your system:
- Fresh, sealed bottle of brake fluid (matching your reservoir cap specification)
- Clear plastic tubing (fitting tightly over the brake caliper bleeder valve)
- A clean glass jar or plastic container
- Wrenches (usually 8mm or 10mm for the bleeder valve)
- A Phillips screwdriver (for the reservoir cap)
- Massive amounts of shop rags or paper towels
- Nitrile gloves and safety glasses
 The Golden Warning: Protect Your Paint!
Brake fluid is a highly aggressive chemical solvent. If a single drop lands on your motorcycle’s painted fairings, fuel tank, or plastic gauge cluster, it will eat through the clear coat and ruin the paint within seconds. Always drape your entire front end and handlebars in thick towels or plastic sheets before starting. Keep a spray bottle of water and soap nearby; water instantly neutralizes brake fluid if a spill occurs.
Step-by-Step Brake Bleeding Blueprint
Follow this sequence exactly to purge every air bubble from your lines.
Step 1: Prepping the Reservoir and Master Cylinder
- Park the motorcycle on a level surface. Turn the handlebars until the front brake fluid reservoir sits perfectly level with the ground.
- Carefully clean the outside of the reservoir cap to prevent dirt from falling inside.
- Remove the screws and lift off the metal cap, the plastic insert, and the rubber diaphragm.
- Top up the reservoir with fresh brake fluid almost to the top line.
Step 2: Setting Up the Caliper Bleed Valve
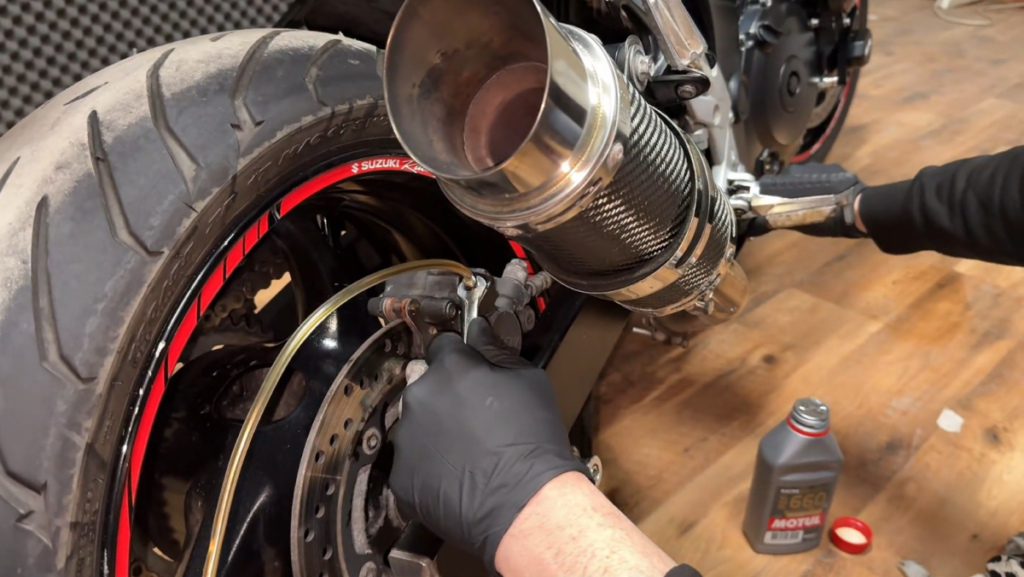
- Move down to the front brake caliper. Locate the bleed valve (a small metal nipple covered by a rubber dust cap).
- Remove the dust cap and place the box-end of your wrench over the valve hex.
- Push one end of your clear plastic tubing tightly onto the bleeder valve nipple.
- Submerge the other end of the tube into your glass jar, filled with a small amount of clean brake fluid. This ensures that if you accidentally release the valve prematurely, the system will suck in clean fluid rather than fresh air.
Step 3: The Pump, Hold, and Crack Sequence
This is the most critical manual sequence. Master this rhythm:
- Pump: Squeeze the brake lever slowly 3 to 4 times to build up hydraulic pressure, then HOLD the lever tightly against the handlebar. Do not let go.
- Crack: While holding the lever tight, use your wrench to turn the caliper bleed valve counterclockwise about a quarter-turn. You will see old fluid and air bubbles shoot through the clear tube into the jar. Your brake lever will sink completely to the handlebar—keep holding it down!
- Close: Turn the bleed valve clockwise to lock it shut.
- Release: Only after the valve is fully closed can you slowly release the brake lever.
- Repeat this exact sequence (Pump, Hold, Crack, Close, Release) 10 to 15 times per caliper.
Step 4: Topping Off Without Introducing Air
- Crucial Check: Every 4 or 5 cycles, look back up at your master cylinder reservoir. As you bleed fluid out of the bottom, the reservoir level drops. If it goes empty, the master cylinder will suck in a massive pocket of air, forcing you to start the entire process over. Keep it topped off with fresh fluid.
- Continue the process until the fluid flowing through the clear tube changes from a dark amber color to a clear, pale yellow, and no air bubbles are visible.
- Tighten the bleeder valve securely, remove the tube, and replace the rubber dust cap. Reinstall the reservoir diaphragm and cap, tightening the screws gently.
Take the Next Step in Mechanical Mastery
Brake maintenance is not just about turning wrenches—it is a matter of safety and survival on two wheels. Bleeding your lines correctly guarantees maximum stopping power when you need it most.
If you want to move past basic fluid flushes and learn how to completely strip down calipers, replace worn brake pads, inspect warped rotors, and master advanced ABS diagnostics, we have a complete blueprint for you. Inside the Shadow Rider Garage Masterclass, our over-the-shoulder video guides take the guesswork out of brake repairs, helping you build a race-grade braking feel right from your home garage.